Intro
In this time, I tried NgRx.It was for managing states like Redux.
[TypeScript] Try React + Redux


Environments
- Angular: 9.1.11
- NgRx: 9.2.0
Install
npx ng add @ngrx/store
Base project
First, I created a sample project what changed states without NgRx.app.component.html
<app-board></app-board>
board.component.html
<div class="board">
<app-square
    *ngFor="let s of state.squares; let i = index"
    [props]="s" (onClick)="updateSquare(i)"></app-square>
</div>
board.component.ts
import { Component, OnInit } from '@angular/core';
import { BoardState } from './board-state';

@Component({
  selector: 'app-board',
  templateUrl: './board.component.html',
  styleUrls: ['./board.component.css']
})
export class BoardComponent implements OnInit {
  public state: BoardState;
  constructor() {
    this.state = this.initialState();
  }

  ngOnInit(): void {
  }
  public updateSquare(index: number) {
    const squares = this.state.squares.slice();
    squares[index] = (this.state.nextIsX)? '✕': '◯';
    this.state = {
        nextIsX: ! this.state.nextIsX,
        squares
    };
  }
  private initialState(): BoardState {
    return {
        nextIsX: true,
        squares: Array(9).fill(null),
    };
  }
}
board.component.css
.board {
    display: flex;
    flex-direction: row;
    flex-wrap: wrap;
    height: auto;
    width: 21vw;
}
board-state.ts
import { SquareValue } from './square/square-value';

export type BoardState = {
    nextIsX: boolean,
    squares: Array<SquareValue>
};
square.component.html
<button class="square" (click)="click()">{{props}}</button>
square.component.ts
import { Component, OnInit, Input, Output, EventEmitter } from '@angular/core';
import { SquareValue } from './square-value';

@Component({
  selector: 'app-square',
  templateUrl: './square.component.html',
  styleUrls: ['./square.component.css']
})
export class SquareComponent implements OnInit {
  @Input() props: SquareValue;
  @Output() onClick: EventEmitter<void> = new EventEmitter();
  constructor() { }

  ngOnInit(): void {
  }
  public click() {
    this.onClick.emit();
  }
}
square.component.css
.square{
    height: 7vw;
    width: 7vw;
}

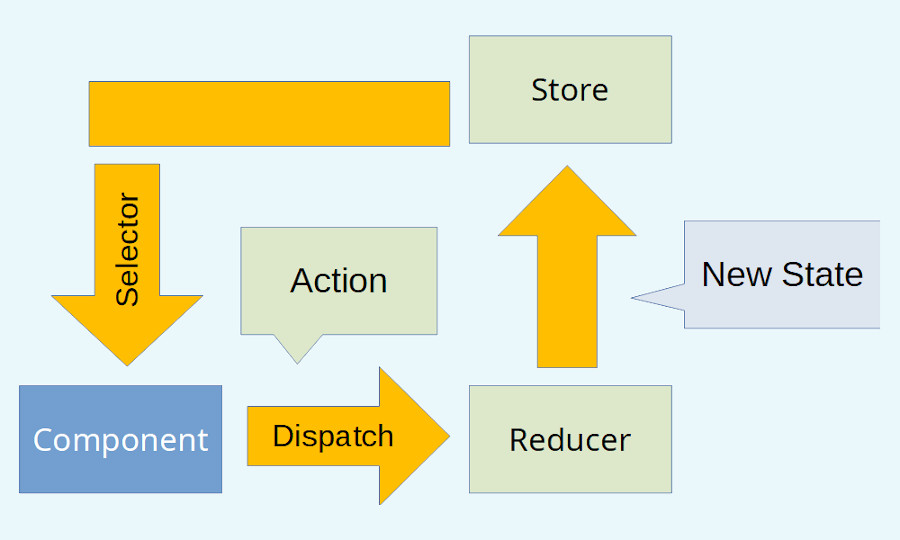
Action, Reducer, Store
Create actions
To describe "What's happened", I created an action.game.actions.ts
import { createAction, props } from '@ngrx/store';

export const updateSquare = createAction('[Game] updateSquare',
    props<{index: number}>());
Create reducers
To express "How the state would be changed", I added a reducer.game.reducer.ts
import { createReducer, on, Action } from "@ngrx/store";
import { BoardState } from './board/board-state';
import { updateSquare } from './game.actions';

function initialState(): BoardState {
    return {
        nextIsX: true,
        squares: Array(9).fill(null),
    };
}
function getUpdatedState(lastState: BoardState, index: number): BoardState {
    const squares = lastState.squares.slice();
    squares[index] = (lastState.nextIsX)? '✕': '◯';
    return {
        nextIsX: ! lastState.nextIsX,
        squares
    };
}
const _gameReducer = createReducer(initialState(),
    on(updateSquare, (state, {index}) => getUpdatedState(state, index)));

export function reducer(state: BoardState | undefined, action: Action) {
    return _gameReducer(state, action);
}
const _gameReducer = createReducer(initialState(),
    on(updateSquare, (state, {index}) => getUpdatedState(state, index)),
    on(resetSqure, (state) => initialState()));
Add the reducer into StoreModule
To manage the state and use the reducer, I added the reducer into StoreModule.app.module.ts
import { BrowserModule } from '@angular/platform-browser';
import { NgModule } from '@angular/core';

import { AppComponent } from './app.component';
import { StoreModule } from '@ngrx/store';
import { BoardComponent } from './tic-tac-toe/board/board.component';
import { SquareComponent } from './tic-tac-toe/board/square/square.component';
import * as gameReducer from './tic-tac-toe/game.reducer';
@NgModule({
  declarations: [
    AppComponent,
    BoardComponent,
    SquareComponent
  ],
  imports: [
    BrowserModule,
    StoreModule.forRoot({game: gameReducer.reducer})
  ],
  providers: [],
  bootstrap: [AppComponent]
})
export class AppModule { }
Connect with the component
To get current state and call the reducer, I used store and select in "Board" component.board.component.ts
import { Component, OnInit } from '@angular/core';
import { BoardState } from './board-state';
import { Store, select } from '@ngrx/store';
import { Observable } from 'rxjs';
import { updateSquare } from '../game.actions';

@Component({
  selector: 'app-board',
  templateUrl: './board.component.html',
  styleUrls: ['./board.component.css']
})
export class BoardComponent implements OnInit {
  // receive current state
  public state$: Observable<BoardState>;

  constructor(private store: Store<{game: BoardState}>) {
    this.state$ = store.pipe(select('game'));
  }
  ngOnInit(): void {
  }
  public updateSquare(index: number) {
    // call the reducer to update the state
    this.store.dispatch(updateSquare({index}));
  }
}
board.component.html
<div class="board">
<app-square
    *ngFor="let s of (state$|async)?.squares; let i = index"
    [props]="s" (onClick)="updateSquare(i)"></app-square>
</div>
コメント
コメントを投稿